Whenever you create a new file, open a new file or save a new file, you are presented with a File Dialog Box, where you can save the files. On its LHS are mentioned standard locations or places like Desktop, Computers, Pictures, etc, which are easily accessible. This is called as the Places Bar or the Favourites Links in Windows 7 & Vista.
You can with this tip, add your desired custom shortcuts to Open and Save dialog boxes in Vista.
Open Explorer and navigate to folder C:\Users\Owner\Links, where, Owner is Your Name. Rt click in the window pane and choose New > Create Shortcut. Paste the path of the folder, which you are desirous of adding > Next > Give Shortcut a Name > Finish. Your Places Box will now show the custom desired places ! WinVistaClub / Downloads have been added this way, below.
There are other ways too for doing this.
1) Open Registry Editor and navigate to:
HKEY_CURRENT_USER\Software\Microsoft\Windows\CurrentVersion\Policies\comdlg32\Placesbar
Rt click on the Place0 in RHS pane and click on Modify. Add the desired folder path in Value Data and click OK. Do so similarly for other places.
2) The places bar can also be changed using Group Policy. To do so, Type gpedit.msc in Start Search Bar and hit enter. Navigate to User Configuration > Administrative Templates > Windows Components > Windows Explorer > Common Open File Dialog > Items Displayed In Places Bar.
Click on Display Properties, to open its Dialog Box. Select Configured, and add the folder paths in the boxes provided. Click Apply > OK.
In Windows 7 & Vista, this policy change setting will apply only to applications that are using the XP style common dialog box and not to the new Windows common dialog box style!
Alternatively, there are various small applications which are also available, the PlacesBar Editor being one where you can customize Vista as well as Office Dialog Places. Some other freeware are Shell Places Bar Editor, PlaceBar Constructor, & PlacesBar Tweaker.
Data recovery the quick and easy way with ubuntu desktop linux ubuntu 9.04 without comments
Ever had a failing disk? Using some hard drive recovery tools we can make salvaging our valueble data something possible.
Using dd_rescue we are going to make an image of the hard drive onto a reliable storage area, then we can run whatever filesystem recovery utilities we want.
The beauty of ddrescue is that it is fully automated and will rescue all the blocks that it can read successfully on the first pass, and with any bad blocks it will come back and retry as much as possible.
Install ddrescue tools
sudo apt-get install ddrescue
Connect the failed disk to your system
By either plugging the drive directly into system, or using one of those usb enclosure or slotted drive device you’ll need to have your failing hard disk connected and unmounted before we can begin.
sudo dd_rescue /dev/sdb disk-image.img
mnk0@earth:~$ sudo dd_rescue /dev/sdb disk-image.img
[sudo] password for mnk0:
Summary for /dev/sdb -> disk-image.img:r: 0.0k, succxfer: 228352.0k
dd_rescue: (info): ipos: 229376.0k, opos: 229376.0k, xferd: 229376.0k
errs: 0, errxfer: 0.0k, succxfer: 229376.0k
+curr.rate: 26249kB/s, avg.rate: 28391kB/s, avg.load: 13.5%
We can now mount this image on our system and take a look at the files.
mount -t ext3 -o loop disk-image.img /mnt/tmp
Using dd_rescue we are going to make an image of the hard drive onto a reliable storage area, then we can run whatever filesystem recovery utilities we want.
The beauty of ddrescue is that it is fully automated and will rescue all the blocks that it can read successfully on the first pass, and with any bad blocks it will come back and retry as much as possible.
Install ddrescue tools
sudo apt-get install ddrescue
Connect the failed disk to your system
By either plugging the drive directly into system, or using one of those usb enclosure or slotted drive device you’ll need to have your failing hard disk connected and unmounted before we can begin.
sudo dd_rescue /dev/sdb disk-image.img
mnk0@earth:~$ sudo dd_rescue /dev/sdb disk-image.img
[sudo] password for mnk0:
Summary for /dev/sdb -> disk-image.img:r: 0.0k, succxfer: 228352.0k
dd_rescue: (info): ipos: 229376.0k, opos: 229376.0k, xferd: 229376.0k
errs: 0, errxfer: 0.0k, succxfer: 229376.0k
+curr.rate: 26249kB/s, avg.rate: 28391kB/s, avg.load: 13.5%
We can now mount this image on our system and take a look at the files.
mount -t ext3 -o loop disk-image.img /mnt/tmp
Create a keyboard shortcut to open a folder for windows xp , windows vista and windows 7
Do you have a folder that you'd like to be able to open quickly and easily whenever you want? If you create a keyboard shortcut for that folder, you can open it anytime by pressing a key combination, no matter which other programs you have open.
To create a keyboard shortcut to open a folder
1.
Click on Start, All Programs, Accessories, and then click Windows Explorer.
2.
In Windows Explorer (the program that appears when you open folders such as My Computer, My Documents, My Pictures, or My Music), right-click the folder to which you want instant access, click Send To, and then click Desktop.

3.
On your desktop, right-click the new shortcut, and then click Properties.

4.
On the Shortcut tab, click in the Shortcut key box. Now press the letter on your keyboard that you want to use to open the folder.
Note: In the Shortcut key box, Microsoft Windows XP automatically adds CTRL+ALT before the key you press, because to use the shortcut to open a folder, you have to hold down both the CTRL and ALT keys simultaneously, while pressing the letter you chose. This way, your folder won't open every time you type that letter.

5.
Click OK.

6.
Now test your shortcut. Hold down the CTRL and ALT keys, and then press the letter you chose.
To create a keyboard shortcut to open a folder
1.
Click on Start, All Programs, Accessories, and then click Windows Explorer.
2.
In Windows Explorer (the program that appears when you open folders such as My Computer, My Documents, My Pictures, or My Music), right-click the folder to which you want instant access, click Send To, and then click Desktop.

3.
On your desktop, right-click the new shortcut, and then click Properties.

4.
On the Shortcut tab, click in the Shortcut key box. Now press the letter on your keyboard that you want to use to open the folder.
Note: In the Shortcut key box, Microsoft Windows XP automatically adds CTRL+ALT before the key you press, because to use the shortcut to open a folder, you have to hold down both the CTRL and ALT keys simultaneously, while pressing the letter you chose. This way, your folder won't open every time you type that letter.

5.
Click OK.

6.
Now test your shortcut. Hold down the CTRL and ALT keys, and then press the letter you chose.
Speed up menu display in windows xp
Microsoft Windows XP uses many visual effects to provide a rich, friendly interface. One of these settings allows menus to fade into view when you open them. This visual effect is so smooth that you may never have noticed it; however, the effect does cause menus to take a little longer to appear.
On a fast computer, this shouldn't be an issue. But on a computer that isn’t responding as quickly as you'd like, you can make menus display faster.
To speed up menu display
1.
Click Start. Right-click My Computer, and then click Properties.

2.
Click the Advanced tab. In the Performance area, click Settings.

3.
On the Visual Effects tab in the Performance Options dialog box, clear the Fade or slide menus into view check box.

4.
Click OK.
5.
In the System Properties dialog box, click OK.

Now when you click a menu, it will appear almost instantly.
On a fast computer, this shouldn't be an issue. But on a computer that isn’t responding as quickly as you'd like, you can make menus display faster.
To speed up menu display
1.
Click Start. Right-click My Computer, and then click Properties.

2.
Click the Advanced tab. In the Performance area, click Settings.

3.
On the Visual Effects tab in the Performance Options dialog box, clear the Fade or slide menus into view check box.

4.
Click OK.
5.
In the System Properties dialog box, click OK.

Now when you click a menu, it will appear almost instantly.
How To Benchmark & Troubleshoot Game Performance Using Fraps

Synthetic benchmarks (like furmark is the best) are a great tool for finding out how well your computers can play games. They provide a baseline which allows you to compare how upgrades and changes to your computer have improved or degraded performance.
Synthetic benchmarks can also be used as a point of comparison to other systems with similar specifications, which lets you see if your computer is operating the way it should or if there is perhaps something holding it back.
However, synthetic benchmarks are, ultimately, synthetic. In other words, they don’t represent real world performance.
Achieving a very high 3DMark score won’t help you determine your framerate in one particular game. While some games, like first person shooters, often come with built-in benchmarks, many games do not.
Discovering Real Performance
To find out how your computer is performing during real gameplay and help increase video game performance, you can use an tool called Fraps. This tool is commonly used by professional hardware reviewers to find out how well hardware configurations are working in games which don’t have benchmark utilities included.
Fraps is something of a strange tool in that it fills a lot of different niches at once. The paid version, for example, can record video of gameplay. We’re only interested in benchmarking our games, however, so the free version of Fraps will work just fine.
The Eyeball Benchmark
Once you’ve downloaded and installed Fraps, launch the program and then launch the game that you would like to benchmark. The framerate of the game will display in yellow text in a corner of the game. Where the text displays depends on your settings – in my case, I decided to have it display in the lower left hand corner of the screen.
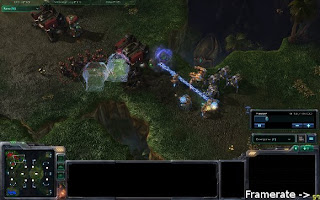
While you’re playing, keep an eye on the framerate number. If you see that it starts to dip lower than 30 frames per second, pay attention to what you are doing and see if you can find a correlation between that and the dip in framerate. Did you just fire a specific weapon? Did you just change your view? Did you just enter a cutscene? Did you just enter a very wide, open area?
Paying attention to these details can help you troubleshoot your framerate if your game seems to run slow from time to time. For example, if you do find that the framerate number drops signifcantly in an open area you may need to reduce the game’s draw distance so that fewer far away objects are rendered on the screen in order to increase video game performance.
Recording Benchmark Data
You can use the eyeball benchmark to troubleshoot problems with game performance, but if you want to know how a game is running overall you’ll need to record some benchmark data.
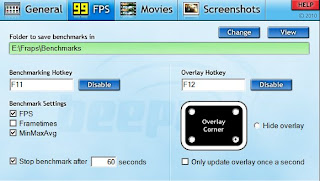
When you’ve reached the area of the game you’d like to benchmark, press F11 to begin. The game will continue to run normally – you can and should play just like you would normally play. By default the benchmark will last 60 seconds, but you can custom that to be longer or shorter as you desire.
When the benchmark has finished all data about the benchmark will be dumped into spreadsheet files located in the Fraps\Benchmarks folder. Taking a look at this data will tell you important information about how the game performed overall.
Making Sense Of Benchmark Data
The benchmark you recored will result in two spreadsheet files. The first is labeled by the game being played (yes, it usually knows what game you’re playing) the data and the time. At the end you will also find the acronym “fps.” This does not show the average of your frames per second recorded, but rather shows how many frames per second your game had every second.
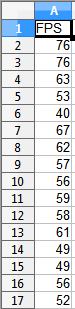
The data here should be fairly consistent overall if the area of the game you benchmarked was also consistent. For example, you should generally receive similar framerates throughout the entire benchmark if you were just walking around a forest. However, if half-way through the benchmark you were ambushed and had to go into combat you’ll probably see that your framerates dip at that point.
The other, more useful file is labeled the same way but instead has the label “minmaxavg” affixed to the end. This spreadsheet tells you your minimum framerate, maximum framerate, and average framerate. My example benchmark probably isn’t the best – I ended up getting into combat towards the end, and framerates went down when that happened.
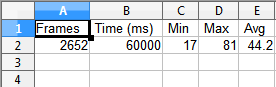
There are a couple important conclusion we can draw from this data. For example, the minimum framerate and maximum framerate shown above are not at all consistent. This tells me that there is something specific which is occasionally slowing down my game. The game I was playing has a lot of special effects which occur in combat, so if I turned down the settings for those effects my game wouldn’t slow down as much and the minimum wouldn’t be so low.
I can also see that my game is, on average, achieving a framerate of 44.2 frames per second. Thirty frames per second is usually considered the minimum desirable average framerate, so I’m doing well in that regard. Performance dips aside, my game is enjoyable.
Conclusion
Fraps is an amazing benchmark utility to troubleshoot and increase video game performance. It gives you the chance to see how your games really perform and it also lets you troubleshot specific performance issues so that you can figure out which graphical settings are giving your computer trouble. Fraps is a free download, so go check it out now.
Subscribe to:
Posts (Atom)
All tips and Tricks share over here are only for education purposes. Powered by Blogger.


